 Several years ago, when I bought a queen bed, I made a duvet cover for my feather comforter, using an abundance of very old green and white cotton seersucker, cut into squares. I purchased a set of pink and white striped twin sheets, which I cut into squares and strips, and sewed them all together. Teaming this duvet with a set of pink sheets and some additional green bordered pillowcases made for a beautiful combination. However, while folding my clean sheets last week, I noticed that my pink pillowcases were becoming frayed along the edges. ...Yes, I must have had my glasses on at that moment, or it would have passed unnoticed. This fraying did not have me tossing them out and making a mental note to go shopping. With lots of wear left in the sheets, I certainly wanted to extend the use of the cases. Here is where not throwing anything away can pay off! Instead, I got out the sewing machine and remnants of fabric and made them new again.
Here is how I did this (Please pardon some of the photos that came out on the dark side)...
 1. Cut the hems off your cases at the stitching.
2. Then, cut a strip of your ruffle fabric that is about 1.5 inches wider than your hem measurement.
1. Cut the hems off your cases at the stitching.
2. Then, cut a strip of your ruffle fabric that is about 1.5 inches wider than your hem measurement.
A nicely flouncing ruffle is achieved by using the rule of thumb of cutting the strip 1.5 times longer than the edge you are sewing it to. For a very flouncy look, be more generous. Mine follows the rule of thumb.
3. Hem one edge of the ruffle strip, by turning 1/4 inch to the wrong side and pressing it flat. Then, turn it again, so that the raw edge is hidden, and press again.

 4. On the opposite edge of your ruffle, run gathering stitches. This is done by sewing with the right side up, and having two rows of stitching, about 1/4 inch from the edge, and again 1/4 inch away from the first row. Gathering stitches will be the longest straight stitch setting on your machine.
 5. After you have done the gathering stitches, then mark your ruffle by pinning each end as it lies flat. Then, match up the two pins, and lay it flat again. This will give you another halfway marker, dividing it into quarters.
Mark your pillow case edges in the same way.
6. Now, match up the markers and pin the ruffle to the case. Match the seam of the ruffle to the seam of the pillow case, and make sure that the right side of the ruffle is facing down against the right side of the case. The stitches that are viewable to you will then be gathered up by pulling the same ends of each set of rows, simultaneously, so that they will pull in evenly. Work slowly, and arrange the gathers so that they are evenly distributed between the pins. Be sure that the gathers are not so tight that they are tighter than the case.
5. After you have done the gathering stitches, then mark your ruffle by pinning each end as it lies flat. Then, match up the two pins, and lay it flat again. This will give you another halfway marker, dividing it into quarters.
Mark your pillow case edges in the same way.
6. Now, match up the markers and pin the ruffle to the case. Match the seam of the ruffle to the seam of the pillow case, and make sure that the right side of the ruffle is facing down against the right side of the case. The stitches that are viewable to you will then be gathered up by pulling the same ends of each set of rows, simultaneously, so that they will pull in evenly. Work slowly, and arrange the gathers so that they are evenly distributed between the pins. Be sure that the gathers are not so tight that they are tighter than the case.


 7. Finally! Sew your ruffle to the case, with your stitching line just above the 1/2 inch gathering row, using a normal stitch length. This row of stitching is between the two gathering rows. Then, use an overcast or zig-zag stitch to finish the raw edges. Now, you can pull out the gathering stitch row that is outside all the stitching. Trim the thread ends, and turn and press your ruffle seam toward the casing side.
 8. The final step! Do a row of edge-stitching, which is simply a row of normal size stitches, that are very close to the seam, or about 1/8 inch away on the casing side. This will hold the seam in place on the inside and keep a crisper look.
Creativity Bootcamp Day 7
We are talking "Fly" for Day 7. It gave me pause, yet you can see that I have not been slacking. Then, out of the "blue" came an idea from the blog of my friend, Jocerane, in France. She suggested starting a tale of a traveling blue oak leaf, and I thought "Perfect!" So, to compliment her blog, here is my tale of the Little Blue Oak Leaf (leaf recycled from an envelope I received in the mail!):
The Little Blue Oak Leaf was caught into the winds and flew hither and thither, not knowing where it would land, or what condition it would be in when it did. Poor little leaf! Finally, in a furious storm in the dead of night, it felt itself caught and held fast. Exhausted, it fell fast asleep. When it awoke with the first rays of dawn, it knew a terrible dread! It was held fast in the jaws of a ferocious dragon. Oh the terror it felt! Poor little leaf. Yet, as the dragon awoke, he gave a great yawn, and the little leaf lost no time in catching his escape on a breeze that nearly drowned him in a birdbath. Luck, however, was with him, and he was caught and saved by the fairy who inhabited the birdbath who fortunately was taking her morning splash.
 This kindly fairy gently set it down with some of it's distant relatives, the Pin Oak leaves of South Carolina. The Little Blue Oak Leaf had flown all the way across the Atlantic Ocean!
 Creativity Bootcamp Day 6
FLUID!
"The Hurrier I Go the Behinder I Get..."
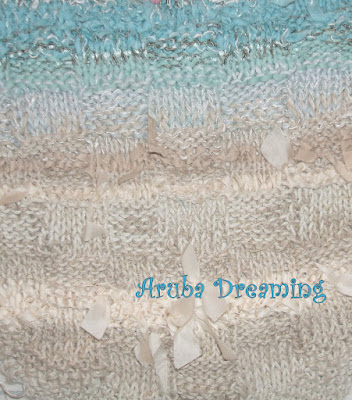
One thing about posting to the public, you can't hide getting off-track. I admit it, I have fallen behind on the Bootcamp. I am still working on it, in my mind, but other things have jumped in as priorities. It all to the good. Why? ...Because it is all part of the process. If something I am doing gives me some inspirational burst that takes me into another direction for a moment, that is just who I am. I am certainly capable of focusing and doing one thing at a time, but occasionally, our journeys present us with opportunities that are fleeting and must be grasped at that very moment or they will dissipate and be gone. I like to take those opportunities. For instance, In the past few days, rather than follow the Bootcamp on a day by day basis, I have found the needed inspiration to continue with a knitting project I was in limbo with. Decisions, ...decisions. It was all about fluidity. This is my inspiration photo, a beach in Aruba...
 I was stumped over the yarn progression. I began with linen, cotton, and some blends. Then, as I got into the blue-greens of the water, I went into mohair and wool. The texture annoyed my sensibilities. I didn't care for how the well-defined stitches morphed into furry blurry. It was lacking in fluidity. As this project is planned to be a sweater, it seemed that more consistency was needed. So, ...
What happened? Well, I became aware of a fiber artist (more on her later!) using fabric strips in an incredible way, and it inspired me to use more of my own. My problem is that my amazingly huge fabric stash has never come out of the boxes since I moved into this house eight years ago! My lack of organization has many reasons from long illness, mother moving in, daughter-in-law moving in, both moving out, surgery (all better now!), mother moving back in, etc., etc. As I am doing very little sewing, I had no real reason to unpack. Recently however, I have been wanting to sew again, and this recent exposure was decisive. So, I have been put to the task of unpacking and storing fabrics in a shelving unit. I am thrilled! This is a huge organizing leap forward for me. ...And it might not have happened without the bootcamp!
 Creativity Bootcamp Day 5 "But as artists, how can we express the world as we see it if we are not feeling it on a deeply emotional level?" ...Exactly! That is just what I was feeling yesterday with the Heavy Metal assignment! I didn't FEEL it, so I had no desire to express it creatively. No guilt at all! Today however, I felt this one: Grow. I like to grow things. Especially herbs, but I don't have a very green thumb. What does grow well for me is devoured by the insect population. As I have an aversion to using herbs that have been toxified by pesticides, there is not much harvesting. Oh well. So I guess you could say I putter at gardening. My yard really has too much shade, and what grows best here is moss. You have seen it before in some of my previous blogs. So, I have to say all I grew here was the sprig of mint peeking out of the top of the recycled flower pot (lined with clear wrap because the pot probably has lead or something in it). Anyway, just a fun way to serve a refreshing treat of watermelon.
Creativity Bootcamp Day 4
Heavy Metal! I put a lot of thought into this and most of what comes to mind is my sons and their terrible teens. I am quite sure that at least half the "character", i.e. white hair on my head is due to those years in the 80's when Heavy Metal ruled the popular music scene. Back then my sons had long hair, pierced one ear and wore a tiny metal skull dangling on a chain. Ozzy Osbourne ate bats, and KISS had an serpently long tongue in my mind. Heavy Metal.
Oh well, I have thought of several projects from jewelry, and photos of various subjects. However, nothing really comes to mind that I want to create on this subject. So, I ask myself if I really want to spend the time to do something that I have no heart in? I don't think so. That would lower this challenge to a "to-do" list that has no meaning, or become an aversion to me. Perhaps, since I am doing this on my own anyway, I will have a back up plan to provide my own themes. Picking each word out of a jar randomly has a better sound to me. The one thing about these dealt out words is that they do make my brain churn around them. Maybe it is simply enough that I can think of ideas to create. The inspiration to create from words implies that there are special feelings attached or accessible, that spur one into artistic action.
 Creativity Bootcamp Day 3
This is another day full of work and not feeling quite up to par with a tension headache. Sleeping "wrong" left me with a crick in my neck that went up into my head. I hate it when that happens. As a result, I looked for an easy way to accomplish the goal for day 3. The theme is "multi-layered." Still thinking along the lines of food, lasagna came to mind. Usually, I'll make up a quicky from leftover spaghetti, otherwise using the expected ingredients. Definitely layers. I served up spaghetti for lunch, but I guess we were all hungry, because there just wasn't enough left to think about lasagna.
Thinking cap on again, mu thoughts traveled in another direction. Memories of a screen saver I used a few computers back spoke to me and a flood of images told me what to do. Simply rocks! The first time I ever knew anyting about stacking rocks was during a knitting KAL on Ravelry. The pattern is on by Jane Thornley, called Culture Fushion Wrap. Based on a favorite place we have been , I chose China, and was searching the web for ancient temples in Asia. What I found, not Chinese at all, but Korean, was primally beautiful.
Enthralled by the colors and majesty of the temple and these stacks, I was smitten with a desire to know more about the simple act of stacking rock upon rock. A modern day marvel of stacking expertise is Bill Dan, of Sausilito, California. His website has more about the ancient Buddhist monk who created those pagodas at Tapsa temple, and a wonderful exploration of his own work and also that of his many followers.
Creativity Bootcamp Day 3
This is another day full of work and not feeling quite up to par with a tension headache. Sleeping "wrong" left me with a crick in my neck that went up into my head. I hate it when that happens. As a result, I looked for an easy way to accomplish the goal for day 3. The theme is "multi-layered." Still thinking along the lines of food, lasagna came to mind. Usually, I'll make up a quicky from leftover spaghetti, otherwise using the expected ingredients. Definitely layers. I served up spaghetti for lunch, but I guess we were all hungry, because there just wasn't enough left to think about lasagna.
Thinking cap on again, mu thoughts traveled in another direction. Memories of a screen saver I used a few computers back spoke to me and a flood of images told me what to do. Simply rocks! The first time I ever knew anyting about stacking rocks was during a knitting KAL on Ravelry. The pattern is on by Jane Thornley, called Culture Fushion Wrap. Based on a favorite place we have been , I chose China, and was searching the web for ancient temples in Asia. What I found, not Chinese at all, but Korean, was primally beautiful.
Enthralled by the colors and majesty of the temple and these stacks, I was smitten with a desire to know more about the simple act of stacking rock upon rock. A modern day marvel of stacking expertise is Bill Dan, of Sausilito, California. His website has more about the ancient Buddhist monk who created those pagodas at Tapsa temple, and a wonderful exploration of his own work and also that of his many followers. My own simple stack is made with rocks that I brought years ago from the family "cabin" in Pennsylvania. I brought a box full to build a small indoor fountain. I had disassembled it recently when I performed my annual "hosing down of the porch" to get rid of the pollen. So, I recycled a few for this photo. This stack is posed at my favorite photo spot (always good lighting) atop a hypertufa (another story here!) ball in my yard.
 Creativity Bootcamp Day 2
The theme is "picnic," and for me, picnics are rare these days. I would rather prep in my kitchen and grill in the back yard, then eat in the house while I enjoy the air conditioning and the absence of flying and crawling critters trying to eat me and share my feast.
Creativity Bootcamp Day 2
The theme is "picnic," and for me, picnics are rare these days. I would rather prep in my kitchen and grill in the back yard, then eat in the house while I enjoy the air conditioning and the absence of flying and crawling critters trying to eat me and share my feast.
Because so much of the work in doing a picnic is in the packing up of everything from salt and pepper to plates and napkins, and drinks to desserts, I prefer absolute simplicity. My preference is for a picnic of a bottle of wine or beer, a loaf of artisan bread, and some great cheese.
Originally, I had another plan, but it fell through because I forgot to get an essential part when we went grocery shopping this morning. DH and I make the trip to the commissary about every two weeks, and this time it was longer due to our not feeling well. ...Summer colds are the pits! Anyway, I had to give more thought to how I would tie "picnic" and recycling together in another way and make this one a quick project. What I came up with is bread. The recycled element is "bubba" my sourdough starter, and my whole grain, seed ed experiment is rising as I type. What better for a picnic than hearty homemade bread, Boar's Head cheese, and a glass of American wine? In this first photo, I am trying out a new recipe that after an hour of "rising" looks like the dough has no back-bone at all. Just a glob of gooey dough. I took it from here and kneaded in more unbleached flour to increase gluten, and added in some honey to sweeten it up a little and give the yeastie beasties something to grow on, and after a good rise, it baked into a fine loaf.
Pairing it up with wine and cheese is all good, but another favorite recipe is a triumph truly fit for a picnic.
Recipe for picnic loaf:
- Slice the boule in half horizontally. Scoop out the inner portion, leaving the crust walls about 3/4" think.
- Brush the entire inner surface with plain or herbed olive oil.
- Add filling below by spooning it in and packing it high so it will fill the upper part of the crust too.
- Cap with top crust.
- Wrap snuggly with foil.
- Allow to "season" overnight in the refrigerator. Flavors will blend and enhance.
- The following day, carefully unwrap and cut into wedges, being careful to preserve the shape and contents.
- Re-wrap and its ready for the picnic!
Filling:
- scramble one dozen eggs (depends on the size of your boule)
- add shredded cheese as desired
- add seasonings as desired
- in pan, saute diced onions, bell peppers, and garlic. You can also add diced ham , bacon, or sausage if you want a meat.
- stir the egg mixture into the other ingredients and cook til set.
.
 Day 1 was great! I feel like I got so much done. Not only did I meet the days challenge, but I also managed to situate myself with a photo editing solution for a problem that has been making me crazy. The new pc was not loaded with a program to edit photos, and was not compatible with software I have on hand. ...Yet one more mountain to climb. Anyway, I settled on Picasa, which seems to be good, ....for now anyway. The challenge theme for Day 1 is "ivory." My medium of choice is anything that can be recycled. What I have done is to create a Jewelry Tree.
I started with a twig, which I trimmed, and an old can of primer. I painted the entire surface with primer, then painted over that with an "ivory" latex paint. So far, I am recycling the twig, which I saved from a tree being trimmed, and using paints that I have had in storage. All "free!" Then, I had to go shopping. I bought one 25 foot roll of 18 gauge copper wire, which cost me $4.80. That was the only thing I had to purchase. I also had about 6 feet of a much thinner copper wire in my craft stash, which was salvaged from an electrical wire which is made up of several small strands held together by a coating. Cut the coating away, separate the strands.
Day 1 was great! I feel like I got so much done. Not only did I meet the days challenge, but I also managed to situate myself with a photo editing solution for a problem that has been making me crazy. The new pc was not loaded with a program to edit photos, and was not compatible with software I have on hand. ...Yet one more mountain to climb. Anyway, I settled on Picasa, which seems to be good, ....for now anyway. The challenge theme for Day 1 is "ivory." My medium of choice is anything that can be recycled. What I have done is to create a Jewelry Tree.
I started with a twig, which I trimmed, and an old can of primer. I painted the entire surface with primer, then painted over that with an "ivory" latex paint. So far, I am recycling the twig, which I saved from a tree being trimmed, and using paints that I have had in storage. All "free!" Then, I had to go shopping. I bought one 25 foot roll of 18 gauge copper wire, which cost me $4.80. That was the only thing I had to purchase. I also had about 6 feet of a much thinner copper wire in my craft stash, which was salvaged from an electrical wire which is made up of several small strands held together by a coating. Cut the coating away, separate the strands.
Then, I got out
some beads saved from a scrunchie I had purchased several years ago. The glass beads were a disaster to my hair, so I cut them all off and saved them. Never throw anything away!
Next, I studied the twig to determine if it had enough places to hang necklaces and earrings from. They never do, so I added a few. I began wrapping the twig with the 18 gauge wire, being careful to reinforce the tiny branches with doubled wire and wraps. I added the beads to the smaller wire, which I spiraled the ends of to slip over the larger wire, so it was attached on both ends of the beads.Where I wanted to add hanging places, I made a skinny loop of wire and wrapped it on the twig. I embellished the hangers with beads so that the jewelry would be supported.
In all, it took only about two hours of time, and cost was just $4.80. Not bad! Now, I just need to attach it to my wall. I have seen copper plated pipe hanging "tape" with pre-drilled holes. I can cut this and screw the jewelry tree to the wall using toggles.
Here is the full view of the tree hung on my wall fountain so that I could photograph it.

Just the other day, I found an interesting link to a blogsite through the Ravelry forums. It is The Creativity Bootcamp. Megan Beishline is an incredibly creative lady who has lots of energy and likes to motivate others to reach higher levels of achievement. I can so honor and appreciate this. The bootcamp is a ten day challenge to create something new each day, in a medium of our own choosing, based on a random word that Madeline gives the group on that day. I am coming into the Bootcamp late, as all the others are finishing up, but does this really matter?
As it so happens, I was just talking with the DH about doing something very similar for a period of a month. Well, a month may be a little long and maybe I would get behind and way off course. Ten days is definitely doable. My trouble is choosing a medium to work in. I am a changeable and variety loving creator that would be sorely challenged to stay in one medium. After giving this some thought, I have decided that it is really up to me and for my supreme benefit. Most of the participants are into photography, so a few photos a day is easy. Crafting something each day is a whole different challenge. However I feel up to it, and have decided that my "medium" is going to be anything recycled. I will be blogging daily about my experience along the way.

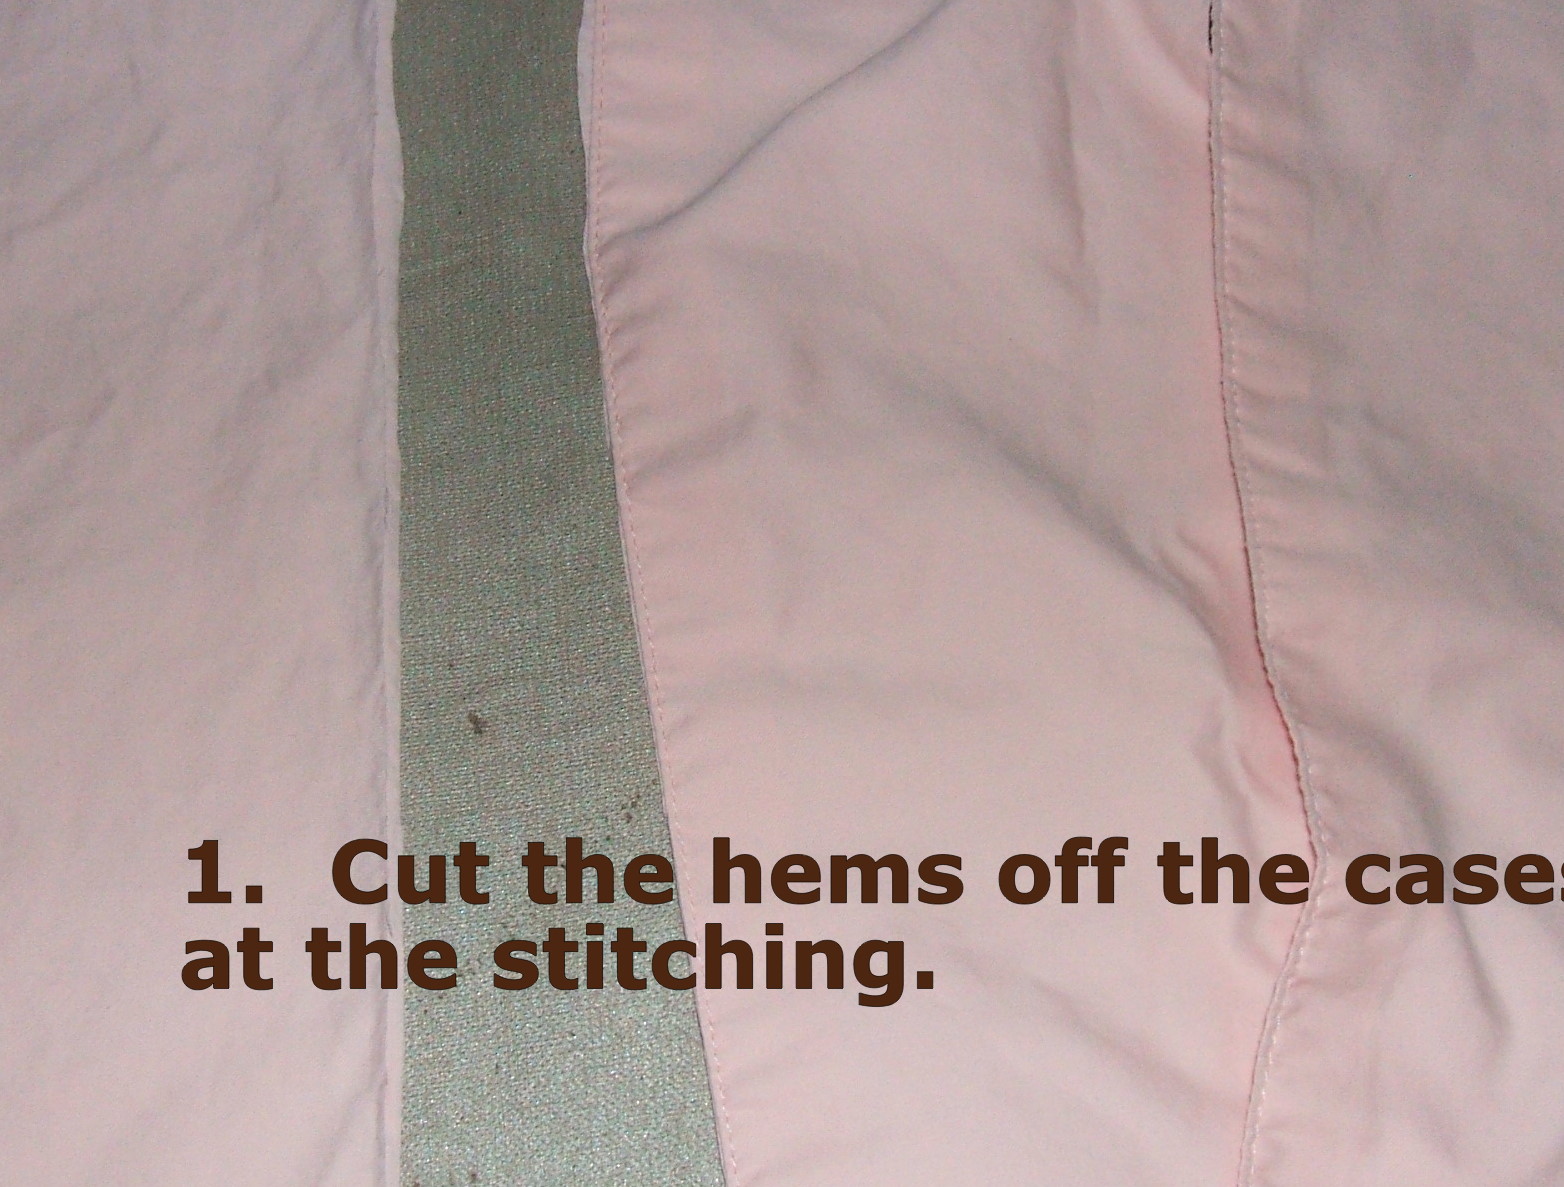 1. Cut the hems off your cases at the stitching.


 8. The final step! Do a row of edge-stitching, which is simply a row of normal size stitches, that are very close to the seam, or about 1/8 inch away on the casing side. This will hold the seam in place on the inside and keep a crisper look.


